Homemade Ginger Bug Recipe
This homemade Ginger Bug Recipe is your golden ticket to getting started with fermented drinks! It’s remarkably easy to create, requires simple ingredients, and sets the stage for an array of delightful, fizzy beverages. Perfect for any season and any occasion – your gut health will thank you for this delightful concoction!
Servings: 1 Ginger Bug
Calories: 220kcal
Ingredients
Day 1:
- 2 cups of spring water or filtered water
- 2 tablespoons granulated sugar
- 30-50 grams chopped ginger unwashed and unpeeled (it was one handful for me, if you don't want to measure)
Days 2-5 (or longer)
- 2 tablespoons granulated white sugar
- 2 tablespoons chopped ginger unwashed and unpeeled.
Instructions
- Combine your chopped or grated ginger root, water, and granulated sugar in a sterilized glass jar. Tip: I sterilized my jar in the microwave for 60 seconds. Washing it in the dishwasher or boiling it for 10 minutes also works.2 cups of spring water or filtered water, 30-50 grams chopped ginger, 2 tablespoons granulated sugar
- Give it a good stir with a clean wooden spoon or shake (lid on!) to mix everything thoroughly.
- Loosely cover the jar with a lid or a clean cheesecloth secured with a rubber band.
- Find a warm spot in your house to let the ginger bug sit undisturbed—but not in direct sunlight or a hot location.
- For the next 5 days, add 2 tablespoons of chopped ginger and 2 tablespoons of sugar to the jar daily.2 tablespoons granulated white sugar, 2 tablespoons chopped ginger
- By day 5, you should start to see little bubbles forming at the bottom of the jar or around the ginger floating at the top – this is a sign that the wild ferment is alive and active! If there’s no activity, check the taste: if it’s sweet, add more ginger; if it’s sour, add more sugar, and wait another day. Another option is to just let it rest an extra day without mixing any extra sugar and ginger. See the full post for more troubleshooting tips.
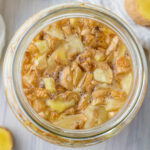
- Once your ginger bug is active and bubbly, strain out the ginger pieces and transfer the liquid to a clean bottle. This liquid is now a concentrated starter culture that you can use to ferment sweetened teas or fruit juices into homemade, probiotic-rich sodas. It's basically the key to unlocking a world of natural sodas and non-alcoholic beverages.
How to Store and Feed Your Ginger Bug Starter
- After straining and using your ginger bug to kickstart a wonderful fermented beverage, don’t just toss the leftover ginger and liquid! Store your active ginger bug in the refrigerator in a jar with a loose-fitting lid. This cooler environment slows down the fermentation process, meaning it requires less maintenance while stored.
- Aim to feed it once a week with 1 tablespoon of grated ginger and 1 tablespoon of sugar. Give it a good stir, and place it back in the fridge.
- If your ginger bug has been in the fridge for a while and seems a little sluggish (not as bubbly as usual), don’t worry! Bring it back to room temperature, and resume the daily feedings of ginger and sugar as you did in the initial process. In a few days, it should perk right back up and be ready to ferment beverages once more.
- For long-term storage, you can actually freeze your ginger bug! Place it in a clean, airtight container (leaving some space for expansion) and stash it in your freezer. When you’re ready to use it again, thaw it in the fridge, and then follow the steps for reviving a dormant ginger bug.
Notes
- Ginger: To make things easier, I like to chop all of my ginger at the same time and freeze the rest in a freezer bag for the daily feedings. That way I don't have to keep chopping it every day.
- Keep it clean: It’s absolutely essential to start with a clean, sterilized jar and utensils. We want to cultivate the good bacteria from the ginger and avoid introducing any unwanted microbes. Simply boiling your glass jar and wooden spoon for 10 minutes is an easy way to sterilize. Another great option is to wash everything in the dishwasher (maybe not the wooden spoon) or, for the jar, pop it in the microwave for 60 seconds. This is what I do, and it works like a charm!
- Be Patient and Observant: Fermentation is as much an art as it is a science. Your ginger bug might be bubbling happily on day 5, or it might need a couple more days. That’s okay! Keep an eye on it, taste it, and adjust as needed based on the instructions. Every ginger bug is unique, just like a sourdough starter, and they can behave differently based on various factors like temperature and the ginger used.
- Sugar is a Must, Not a Sweetener: The sugar in this recipe isn't for sweetness; it's food for the beneficial bacteria and natural yeasts. As they consume the sugar, they produce carbon dioxide (the fizz) and beneficial acids, so the finished drink won’t be nearly as sweet as the starting mixture.
- Use Organic Ginger When Possible: Organic ginger is likely to have more wild yeasts on its skin, which can lead to a more active and vibrant ginger bug. Non-organic will still work, but if you have the option, go organic.
Nutrition
Serving: 50g | Calories: 220kcal | Carbohydrates: 56g | Protein: 1g | Fat: 0.5g | Saturated Fat: 0.1g | Polyunsaturated Fat: 0.1g | Monounsaturated Fat: 0.1g | Sodium: 6mg | Potassium: 184mg | Fiber: 1g | Sugar: 49g | Vitamin C: 2mg | Calcium: 8mg | Iron: 0.3mg